Building a Commodore 64 - Part VIII - (BMC64 Keyboard)
The second step of the BMC64 prototype had passed. The Pi was working and now I could connect original controllers! Now I needed to connect an original C64 keyboard.
Update: C64P - BMC64 Keyboard is my updated and better keyboard solution.
Finding a keyboard
Just like the Ultimate 64 first thing to do is to source and refurbish an original C64 keyboard. Revisit Part II - (Common parts) and Part III - (The Keyboard) to see where to get your hands on one and how to refurbish it.
BMC64 Keyboard Support
BMC64 supports a number of different ways to connect keyboards.
GPIO
BMC64 has a configuration (#2 BMC GPIO Keyboard and Joysticks) to plug a keyboard straight into the GPIO on the Pi!
But... it seems because of the lack of GPIO pins on the Pi, many of the pins between the keyboard and joysticks are shared. Also the configuration doesn't connect the +5V line for pin 7, which is needed to support wireless adapters. Therefore the built in GPIO configuration would not suit my build.
Keyrah V2
BMC64 also supports the Keyrah V2, which lets you use keyboards and joysticks of classic computers on the USB port of a modern PC, Mac or Raspberry Pi.
Perhaps this could solve the problem, allowing the connection of an original C64 keyboard to the Keyrah, and then the Keyrah to the Pi on a USB port? This would allow real controllers and solve the +5V line issue with the keyboard connected via the USB port! Alas the Keyrah is almost impossible to find, and even if you could it is not cheap.
Time to Google... "connect C64 keyboard to USB"
The USB solution
It seems I wasn't the only person trying to connect a C64 keyboard into a modern computer. The people over at Retro Game Coders were looking to do the same thing!
Cheap and Easy Arduino C64 Keyboard to USB Adapter
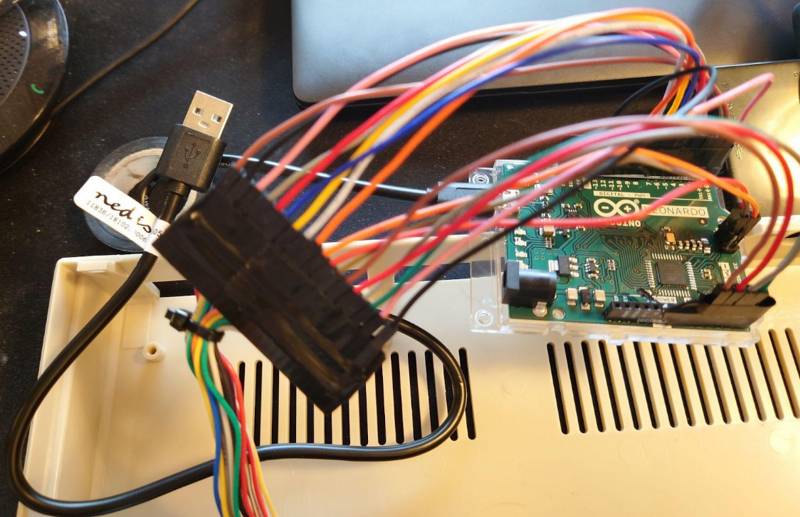
They used an Arduino which can emulate a keyboard directly, and added some firmware to convert the C64 key inputs into a modern HID device, brilliant!
I'm not going to repeat all the instructions here, but I have a short summary below otherwise, just carefully follow the instructions they give you. I also used an Arduino Leonardo instead of Pro Micro they have in the article.
Parts
- Arduino Leonardo
- Jumper wires (Solid tips)
- Black Electrical Tape (For holding the jumper wires in place)
Firmware installation
Programming the Arduino is super easy. Download the Arduino IDE (I used v1.x), from the link below for your operating system.
Grab the keyboard firmware code for the Arduino from GitHub: Real C64 keyboard to USB Adapter Arduino Firmware
Once installed you need to add the HID-Project library to the IDE as it's needed to build the firmware. It's added from the menu as follows:
Sketch -> Include Library -> Manage Libraries...
Search in the list for HID-Project and add the latest library. If you need more information consult the Arduino documentation: Installing Libraries
From the Tools -> Boards menu select the "Arduino Leonardo", then plug in your Arduino Leonardo via the USB port and make sure it is connects.
Open the file named ultimate64-bmc64-keyboard.ino, then use Sketch -> Upload, to build and upload the firmware to the Arduino Leonardo
Note
Don't forget to comment in the "#define BMC64" line
Pinout
Once programmed connect the Arduino Leonardo and the C64 Keyboard header below as shown.
                Arduino Leonardo                          C64 Keyboard Header
                                    +-----+                      1
        +----[PWR]-------------------| USB |--+                  ._.
        |                            +-----+  |       GND  <-->  |O|--1
        |                                     |    NO PIN  <-->  |O|--2
        |                              SCL[ ] |      TX>1  <-->  |O|--3
        |                              SDA[ ] |    NO PIN  <-->  |O|--4
        |                             AREF[ ] |        A3  <-->  |O|--5
        |                              GND[ ] |        A2  <-->  |O|--6
        | [ ]N/C                        13[ ] |        A1  <-->  |O|--7
        | [ ]IOREF                      12[ ] |        A0  <-->  |O|--8
        | [ ]RST                        11[ ]~|       SCK  <-->  |O|--9
        | [ ]3V3                        10[ ]~|      MISO  <-->  |O|-10
        | [ ]5v                 L        9[ ]~|      MOSI  <-->  |O|-11
        | [ ]GND                E        8[ ] |        10  <-->  |O|-12
        | [ ]GND    +------+    O             |         9  <-->  |O|-13
        | [ ]Vin   -|      |-   N        7[ ] |         8  <-->  |O|-14
        |          -|      |-   A        6[ ]~|         7  <-->  |O|-15
        | [ ]A0     +------+    R        5[ ]~|         6  <-->  |O|-16
        | [ ]A1                 D        4[ ] |         5  <-->  |O|-17
        | [ ]A2                 O        3[ ]~|         4  <-->  |O|-18
        | [ ]A3                          2[ ] |         3  <-->  |O|-19
        | [ ]A4      RST SCK MISO     TX>1[ ] |         2  <-->  |O|-20
        | [ ]A5      [ ] [ ] [ ]      RX<0[ ] |                  '-'
        |            [ ] [ ] [ ]              |                  20
        |            GND MOSI 5V  ____________/
        \_______________________/

Thanks to: http://busyducks.com/ascii-art-arduinos
The result
The final build is a C64 keyboard you can connect directly to the USB port of the Raspberry Pi!

Next...
Now I had all the hardware working I needed, but I wanted to figure out some way to mount it all inside a real C64 case.
All C64 Posts
- Building a Commodore 64 - Part X - (BMC64 Summary) » 2022-10-16
- Building a Commodore 64 - Part IX - (BMC64 case mounting) » 2022-10-16
- Building a Commodore 64 - Part VIII - (BMC64 Keyboard) » 2022-02-21
- Building a Commodore 64 - Part VII - (BMC64 Controllers) » 2022-02-01
- Building a Commodore 64 - Part VI - (BMC64 Prototype) » 2022-01-30
- Building a Commodore 64 - Part V - (Controllers) » 2022-01-16
- Building a Commodore 64 - Part IV - (Ultimate 64) » 2022-01-13
- Building a Commodore 64 - Part III - (The Keyboard) » 2022-01-03
- Building a Commodore 64 - Part II - (Common parts) » 2022-01-02
- Building a Commodore 64 - Part I - (Why!?!) » 2021-12-31